You can customize your ClickOnce deployment by setting its property page in My Project. Click the Publish tab to activate the ClickOnce options designer represented in Figure 1.
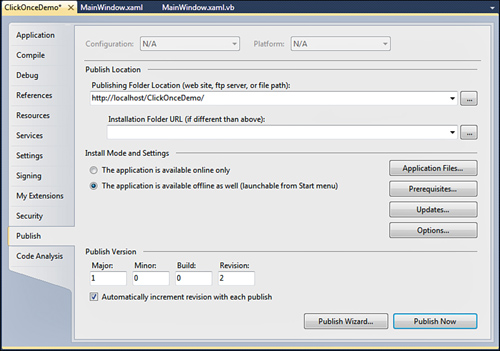
Notice that the upper part of the designer shows
properties that you already set with the Publish Wizard. The Publish
Version group enables specifying the deployment version that is
important for allowing automatic updates. Automatically incrementing the
revision number is a convenient way for allowing installed applications
to check for updates. Just remember that the publish version is just a
ClickOnce-related version and does not affect the application version.
Now let’s take a look at the other available options.
Application Files
By clicking the Application Files
button, you can view or specify files that need to be included in the
deployment package. If you want some required files included in the
deployment package (such as documents or databases), you need to set
their Build Action property as Content.
Generally Visual Studio can automatically classify files according to
their role in the project, so this is something that you rarely need to
perform manually.
Prerequisites
Prerequisites are those files that the application
needs to work correctly, for example runtime components such as the .NET
Framework or third-party controls, which the installer installs on the
target machine before the application is installed. Generally Visual
Studio can detect the appropriate prerequisites and select them for you,
but there are situations in which you need to perform this manually,
for example when you need to install third-party components. Figure 2 shows the Prerequisites dialog.
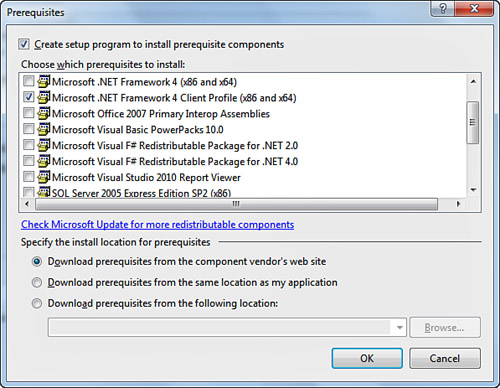
If you use third-party components, ensure that the
producer made available a redistributable package that you can include
in the deployment prerequisites. The .NET Framework will always be
included as a prerequisite, because ClickOnce cannot predict if on the
target machine the .NET Framework is already available.
Custom Prerequisites
Visual Studio 2010 does not provide a built-in
functionality for packaging custom prerequisites. To accomplish this
particular need, follow the instructions described in this page of the
MSDN Library: http://msdn.microsoft.com/en-us/library/ms165429(VS.100).aspx. An alternative is using a free tool called Boostrapper Manifest Generator, which is available on
the MSDN Code Gallery. At the time of this writing, the tool is only
available for Visual Studio 2008, so periodically check its workspace
for updates at http://code.msdn.microsoft.com/bmg.
Updates
One of the most important features in ClickOnce (and
one of the reasons why you should use it) is the capability of updating
applications without writing code to accomplish this. The idea is that
you publish a new version of the application and when you run the old
version, this checks for updates and automatically upgrades to the new
version. Notice that automatic updates are not available for
applications published to the file system. To enable automatic updates,
click the Updates button and then in the Application Updates dialog, check The Application Should Check for Updates check box, as shown in Figure 3.
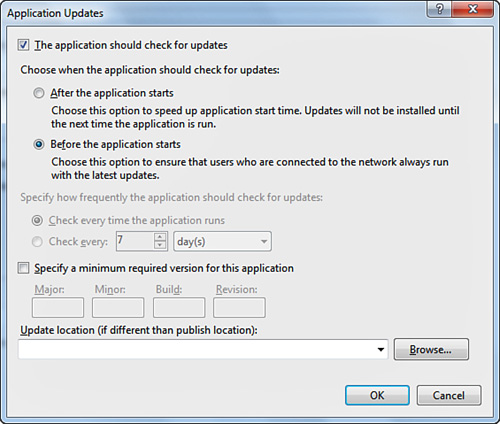
For example, you can decide if the application will
be updated before it starts (default option) so that users always run
the latest updates or if it will be updated after it starts, but in this
case changes will be applied only at the next start. You can also
specify how frequently the application has to check for updates. The
default setting is that the application checks for updates each time it
runs; otherwise, you can specify a time interval expressed in days or
hours or minutes. (This option is available only if you decide to update
the application after it starts.)
|
When
you enable updates, if you want to ensure that this feature works
correctly, perform any kind of modification to the application (for
example, add a button); then publish it again. Finally run the
application and check that the new version is actually downloaded and
installed.
|
Options
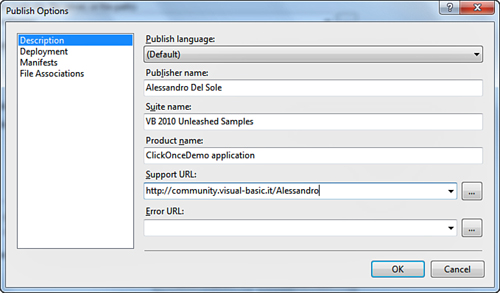
Additions introduced to ClickOnce by the .NET
Framework 3.5 SP 1 have been reprised in .NET Framework 4.0 to provide
better installation customization. When you click the Options
button, you have access to additional features. For example, you can
edit the Description part in the deployment manifest so that you can set
a full description for your installation. Figure 4 shows an example of how you can specify information.
Consider that the Publisher name will be utilized to
create a root shortcuts folder in the Start menu, whereas the Suite name
value will be utilized to create a shortcuts subfolder for the current
application. The Deployment option enables setting some aspects of the
publish process. Figure 5 shows an example for setting such options.
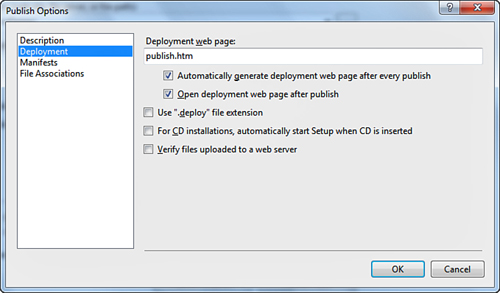
For example, you can decide if the Publish.htm web
page has to be created and shown, if the wizard generates an Autorun.inf
file for automatic CD start, or if the deployment will use the .deploy
extension. Pay attention to this particular option. Unless you uncheck
this check box, the application files will be deployed with the addition
of the .deploy extension, which may cause errors if your application
attempts to access external files. If this is your case, disable the
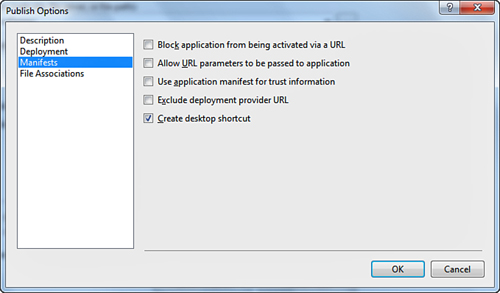
extension and deploy the application again. The Manifest option enables
establishing how application URLs must be treated, but more particularly
it enables setting if a desktop shortcut needs to be created for your
application (see Figure 6).
Another
useful option is the File Associations that is basically the only
Registry customization allowed to ClickOnce and that enables assigning a
file extension to your executable.